Part A below deals with how to fix a dropped stitch on a knit row, and Part B deals with a purl row fix-up.
A: Knit row fix-up in stocking stitch
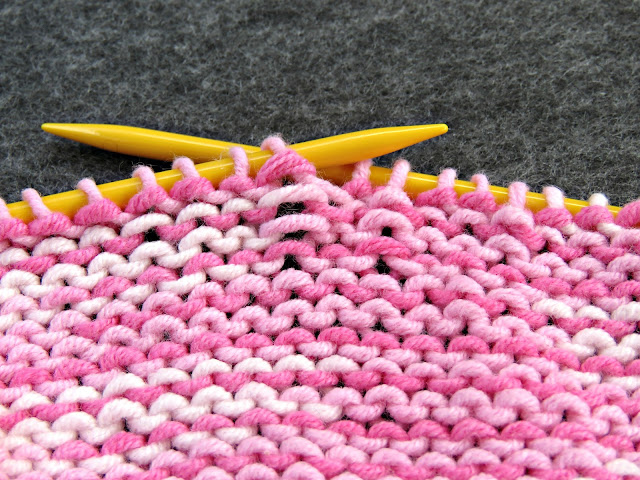
So here's what we start off with:
 |
| Dropped Knit Stitch working in Stocking Stitch |
1. Slip a stitch-holder - or a safety pin - through the dropped stitch so that it won't unravel any further.
2. Slip stitches, without twisting them, from your right needle to your left needle until you get to the dropped stitch.
 |
| 1. Save dropped stitch with a stitch-holder or safety pin 2. Slip stitches to get to the dropped stitch |
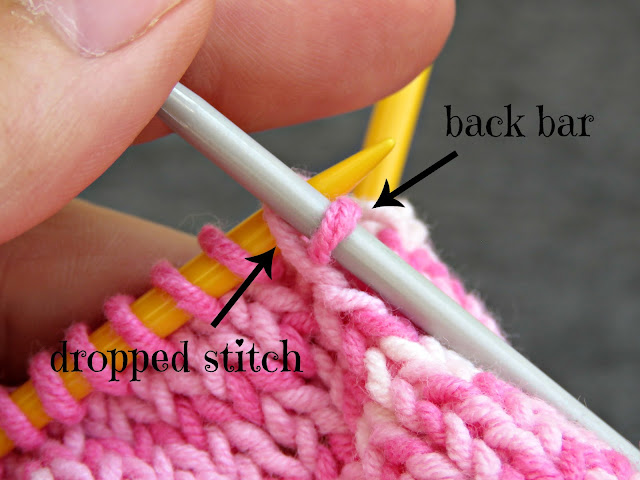
3. Slip a spare needle that's slightly thinner than the needles you've been working on into the dropped stitch from front to back as shown in the photo below. I like to use a thinner needle than I've been working on as this tends to pull the tension of the repaired stitches slightly tighter. I find this to be helpful as repaired stitches are often a little looser in tension than the stitches around them.
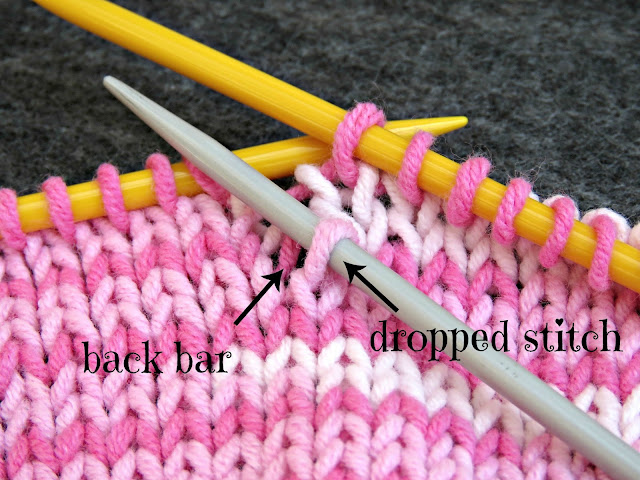
4. Slip the back bar that corresponds with the dropped stitch onto the inserted needle as well. Make sure that you've got the correct back-bar, because if you use the one above or below by mistake the work will pucker.
 |
| 4. Slip needle under back bar that corresponds with the dropped stitch |
 |
| 5. Slip dropped stitch over backbar using left needle |
 |
| Work up the ladder of dropped stitches until you reach the top |
B: Purl row fix-up working stocking stitch
Now I'll be totally honest here: if I find a dropped stitch on a purl row, I simply turn the work around and fix it as though it were a knit stitch. Fixing knit stitches is easier than fixing purl stitches, so why make life more difficult than you need to?
But if, for whatever reason, you want to fix it purl-wise, this is how to do it:
1. Stop your dropped stitch from unravelling any further by securing it with a stitch holder or a safety pin.
2. Slip stitches from the right needle to the left needle until you reach the dropped stitch.
4. Use a spare needle that is a size or two smaller than you're working on. Insert the needle into the dropped stitch from the back to the front as shown below.
5. Insert the left needle into the dropped stitch from front to back, and draw it over the back bar.
6. Pull the back bar through the dropped stitch to replace the lost stitch that had previously been there.
7. Place the saved stitch back on the left needle, or work your way up the ladder of dropped stitches if there are rows of dropped stitches until you've saved them all. Between each step of the ladder you will have to slip the saved stitch off the inserted needle in order to move the corresponding back bar to the front it i.e. to the position shown in the photo below step 4 above. Just slip the saved stitch off, hold it between your forefinger and thumb and lift the back bar over the top of the stitch so that it sits as shown in the photo.
You may find that the tension along the ladder of saved stitches is a little too loose when you're done. Don't worry too much about this. As you knit on it will automatically go some way towards correcting itself, and if it's still obvious by the time you're done you can wash your knitting and leave it to dry. When it's dry you'll find that the tension has sorted itself out. The process of washing and drying can correct any number of tension anomalies in your work.
All the best for now and happy knitting!


Hi Bonny, I found your blog via one of your patterns on Ravelry. I've been dipping into your posts over the past few days. The jug cover with the sea glass beads is on my project list. At present I'm knitting a shawl, which is my first attempt at lace knitting. I've certainly discovered the frustration of missing stitches, though sadly, it isn't as easy to rectify in lace knitting - I'm now using lifelines and making slow progress. I'm sure that many will find this post invaluable. Marie
ReplyDelete