Metadata

Thursday 12 March 2015

Salt and Silver photography ... faces from the 1840's

It's not every day that we get a chance to stare history in the face, and marvel at how the good folk of yesteryear looked ... well ... a bit like us, but if you mosey down to the Tate today you'll be able to do just that at their Salt and Silver exhibition. The costumes, the gentlemen's whiskers and the hair styles belong to another age, but stripped of the fashion foibles of their time, the faces that look out at us look just like the ones we see in the mirror every morning.

Look at this photograph below. It's thought that the subjects were mother and son. I wonder where Dad is, and why he's not in the frame too. They're posing in their Sunday best, and mum's seated on a chair to rest her weary legs. Her nails look like they belong on hands that work hard every day, rather than hands that get treated to time-consuming manicures. Just look at the way she's threading her arm proprietorially through that of her son; look at how she's gazing with maternal affection at her pride and joy. It's an attitude that wouldn't look out of place in a status update photo posted on Facebook today. I love how the boy's neck tie is a bit askew with a loose end jutting out too far to the left of his chin. Maybe he was proud of having tied it himself for the very first time that morning.


Many of the photos in the exhibition are small, which creates logistical difficulties for someone with terrible eyesight like yours truly. And I'm sorry if you were there at the same time as me, and I seemed to be hogging some of the exhibits with my nose as close to the glass as I dared put it. The truth is that I found those faces and portraits from the far-distant past totally compelling. I really had to tear myself away from some of them to give the rest of the people in the gallery a chance.

The whole shooting match kicked off with an amazing polymath called William Henry Fox Talbot who figured out how to make his first camera way back in 1835. Apparently he was motivated to do so because he was a bit rubbish at sketching. He'd used the camera obscura and the camera lucida to help him with his compositions and got to wondering whether he could invent some new gizmo that would capture the scene before him without needing to resort to pencil or charcoal. In time he came up with the technique of producing a negative image of the subject using paper soaked in silver iodide salts. These darkened on exposure to the light producing a negative image of the subject before them.  This negative image was then photographed again to produce a positive image. It was a fiddly process by the standards of today, but it was easier that what his rival photographer, Louis Daguerre, was doing with his cumbersome plates.
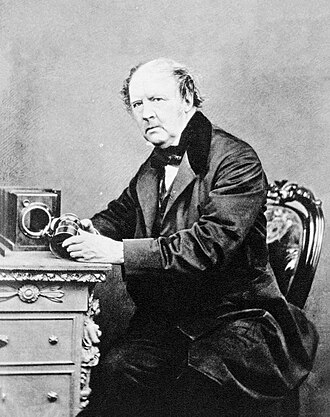
Henry Fox Talbot

The image (below) of Nelson's column as it was being constructed was taken by Fox Talbot himself. Isn't it amazing to see a scene that many top-hatted Londoners must have driven past in their carriages tut-tutting over? They probably thought it an eyesore and a huge inconvenience. And just look at all those bill posters that entrepreneurial types have stuck to the hoardings to promote their wares. How very 21st century! Look at the little wooden hut, where I'm guessing the workmen would  have locked away their tools of an evening when their day's work was done. It looks just like next-door's garden shed.


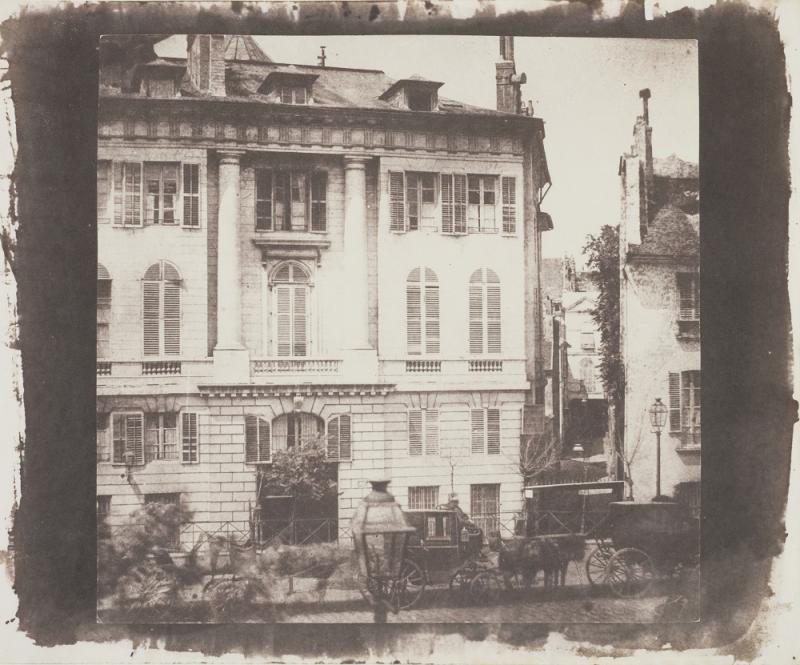
And the image below is another one of Fox Talbot's, showing the view from his hotel window in 1843 when he'd gone to Paris to promote his newly invented salt prints. Isn't it an intriguing snapshot in time of a Paris street scene with the cabbies all patiently waiting in a line for a fare?


I was enchanted by some of the bucolic scenes of country life. Just look at the wonderful image below by Paul Marès of an Ox cart in Brittany, taken in about 1857. Doesn't it look charming? Like it could have been painted by the Impressionists?


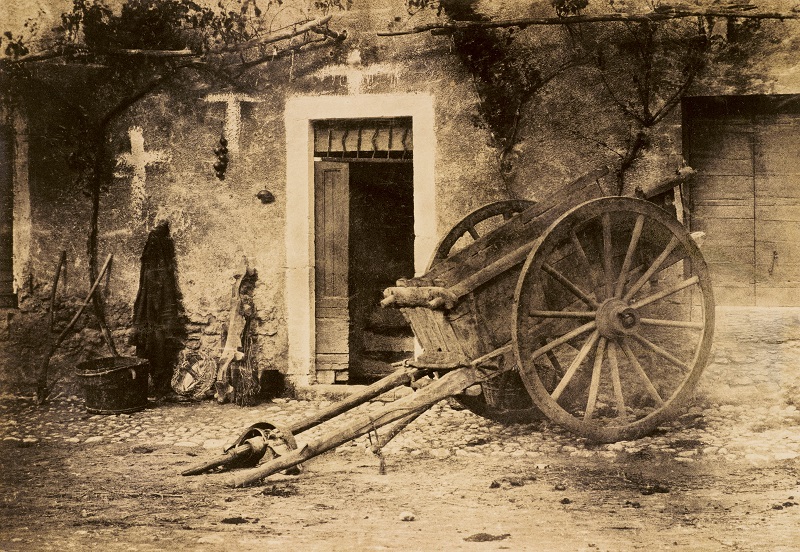
For me it is a perfect example of that soft, velvety texture that was a key characteristic of the technique, and made the image appear much more arty than the sharp definition of the contemporaneous Daguerrotypes. However, those white crosses that were painted on the wall, seemed a bit sinister to me. They jar with the gentle charcoal quality of the composition. On reading about the image I learned that they were commonly painted on walls of rural houses to warn passers-by to keep their distance when the occupants had succumbed to some awful infectious disease. That little nugget of information brought a sinister note to the idle ox cart. Was the driver suffering alone somewhere in the bowels of his home when the image was captured? Did everyone round about feel terror clench their chests when their eyes fell upon those markings? Did they all walk on by and ignore the plight of the people inside?

Or take a look at these Newhaven fishermen in the photograph below:


Do they look as though they're swaggering to you? Once again, in the age of self-promotion on social media, I find their pose thoroughly 21st century. Dressed in jeans and t-shirts they could be a bunch of lads off on a stag weekend. I wonder what they thought about getting their photograph taken? Did they even understand what the man with the strange camera was doing? Did he ever come back and show them their photograph after it had been printed?

And for me that's the lovely thing about this exhibition: it gets you started on a journey of a thousand maybes. As you look at all these individual moments in time your mind, or maybe your heart, craves the backstories and the what-happened-nexts. For anyone with an interest in either social history or the history of photography this exhibition is totally compelling.

If you'd like to go along and see what all the fuss is about for yourself you can check out the website here: Salt and Silver: A rare and revealing collection of early photography. It's running until 7th June. Enjoy!

All the best for now,

Bonny x

Wednesday 11 March 2015

Taking cuttings from your woody herbs ...

I was supposed to go and see the Rubens exhibition at the Royal Academy today, but it was just too nice outside in my garden to spend the morning cloistered indoors with a bunch of porridgy nudes. I'm convinced the great man must have been a total misogynist: what other reason could there be for him to have painted such lumpy, washed-out, unattractive ladies? Maybe I'm mistaken and they were simply his type. Maybe I'll make it tomorrow ... if the sun's not shining ... and I don't get a better offer.

And so today I've been busy digging in the dirt outside, which, for me, is a total joy at this time of the year. My sage bush is looking its age - a bit like one of Rubens's women, and my rosemary bushes are in danger of getting devoured alive. I love rosemary, and manage to add it to just about everything I cook. So in order to big up my supply lines I've taken some cuttings of both the sage and the rosemary.

In a few weeks' time my rosemary will probably be in flower, and as the sap is rising and the growth hormones are stirring it seems to me that this is probably the perfect moment to take cuttings. And the process is about as easy as tripping over the door mat.


All you need to do is slip off a side shoot of about 5 to 6 cm (2 + inches) from the main stem of your plant. It's not brain surgery so you don't have to be too exact. Just bear in mind that if the cutting is too long it makes it more difficult for the emerging roots to support the whole thing, and get it growing as an independent plant.

The (groovy pink) arrows in the photo above are pointing to suitable side shoots that could be slipped as potentially viable cuttings. And the photo below shows a whole bunch that I've slipped off.


I gathered my little bunch together and put them in a jar of water for a few minutes so that they would stay hydrated, and to ensure that the ends were wet when I put them in the rooting powder. That way a lot more of the powder sticks to them.


I used some special seed and cutting compost for potting them up. It's better than regular compost because it's got a finer texture with better drainage so that the cuttings don't rot before they root, and the finer texture creates less obstacles for nascent root growth. You could make your own. There are hundreds of recipes out there in cyber-land, but I took the easy route and bought some from my local garden centre. 


Now you need to remove all the leaves from the bottom 3cm of each cutting. The idea is not to have any greenery that will sit below the soil line or be in contact with it as it'll probably rot and ruin the chances of your cutting taking root. 

Next  dip the cutting in some rooting powder to help the rooting process along as much as possible. You can buy rooting powder in just about any garden centre. Then using your finger make a hole in the compost at the edge of the pot and plant your cutting, gently firming the compost around it to hold it in place. You should aim to have about a couple of centimetres of the stem below the soil line. Carry on with your other cuttings, planting them all around the edge of the pot, so that they'll be easier to separate after they've taken root and started to grow into independent plants. 


When they are all planted up you need to place them in a sheltered spot and make sure that they stay moist without allowing the soil to get waterlogged. I've place mine on top of one of my larger pots that I have yet to plant up for springtime. The pots with the cuttings will be able to draw a certain amount of moisture from the larger pot beneath, and they'll be able to drain into it as well. 


With any luck I should have enough little plants to share with my friends in town who like to grow cooking herbs on their balconies. 

All the best for now,


Bonny x

Tuesday 10 March 2015

Love your leftovers ... Beef and Mushroom pies

The Sunday Roast is a weekly favourite in our house. We love a good roast dinner with all the trimmings. It's a bit of an occasion, and we like to linger around the table, taking our time, putting the world to rights and enjoying what Emi calls golden rainbow family time. It's the one time of the week when no one's in a hurry.

It doesn't matter whether it's beef, chicken, duck, a leg of lamb, or a shoulder of pork; they all taste better for having been slow-roasted in the oven. And ditto too with the veggies and potatoes. My Spanish family rarely cook anything outside of bread, pizza and cakes in their ovens, but over here in Blighty we've always loved our oven-cooked savouries.

One of the great things about this type of cooking is the left-overs. A good roast of beef, like we had last Sunday, can easily be stretched out over a couple of dinners. And what you do with the left-overs can be just as tasty as the main event.

Last night I made these beef and mushroom pies from our Sunday leavings. And they went down a treat with the troops at supper time.


If you'd like to have a go at making some of your own, they're easy and quick to prepare. Here's my recipe, which should produce individual pies for 5 or 6 people (depending on how generous you are with the filling):

Ingredients

My left-over Sunday Roast weighed about 400g after I'd cut off all the bits of fat


250 g sliced mushrooms
2 bay leaves
1 large carrot peeled and sliced into smallish slices
1 large leek, washed and finely sliced
4 toes of garlic finely sliced
200 ml of gravy also left-over from our Sunday dinner - made using the cooking juices from the joint
200 ml red wine
A couple of sprigs of finely chopped thyme
pre-rolled puff pastry
1 egg for an egg-wash (optional: I don't do this as one of my troops has an egg allergy and I can't be faffed trying to remember which pie I haven't put the egg-wash on. It's easier for me to go eggless.)

Method

1. Over a low heat sweat the leeks, carrots and mushrooms in a saucepan with the bay leaves and the thyme and a good glug of olive oil for about 15 minutes. You want them to be soft, but not browned.
2. Add the red wine, and turn the heat up to burn off the alcohol for 5 minutes or so, stirring to make sure that the mixture doesn't catch on the bottom.
3. Add the diced meat and the gravy. Season with salt and pepper to taste. Stir well so that everything's nicely mixed and set to one side (off the heat).
4. Roll out the pastry and cut circles for the bases of your pies and for the tops. I use a pie tray with individual pie moulds that measure 9cm in diameter and have a depth of 6 cm. I think they produce a pie of perfect proportions for each person. Through trial and error I've discovered that if I use a Portmeirion cereal bowl to cut around it makes a perfectly sized circle for the pie casing, and cutting around the base of an Emma Bridgwater mug makes the perfect pastry roof to go on top. Ideally you want your case to sit just a little bit higher than the top of the mould so that you can squish it into the roof to seal the whole thing up, but we'll get to that later.
5. Butter the pie moulds to stop things sticking, and line them with pastry.


6. Spoon the beef and vegetable mixture into your pie cases. Be sure and pick the bay leaves out of the mixture and discard, as they won't make great pie-filling. Place the pastry lids on top, and push them gently into the walls of the cases with the prongs of a fork to seal the edges. Then slice through the top with a knife to make two or three steam vents.


7. If you're doing an egg-wash. Beat your egg and glaze the tops of the pies with the egg mixture using a pastry brush.
8. Bake in a pre-heated oven at 220º C for 20 minutes. Then, without opening the door, turn the heat down to 180º C, and leave them to bake for a further 25 minutes.
9. Remove from the pie moulds with a palette knife and serve with a Greek salad or whatever sort of side-dish takes your fancy.


Enjoy with your nearest and dearest and a decent glass of vino.

All the best for now,

Bonny x

Friday 6 March 2015

TGI Friday ... 5 Random things ...

Yippee it's Friday ... and the sun is shining ... and tomorrow the mercury is promising that it will push its way up to 14ºC up here in the Big Smoke.

I think Spring may finally have sprung! And not a moment too soon in my book. I so dislike those cheerless grey days of January and February, but now we're into merry old March,  the sap is rising and I'm feeling so much better. There's something to be said for having more daylight as the days lengthen, and there's a lot to be said for the gentle caress of the sun on your face when you venture out of doors.

So, without further ado, here are five random things that have rocked my world this week.

1. Spring Flowers

I'm really enjoying the spring colour that's gently pushing its way through all the drab greyness of winter. Yesterday I collected a whole bunch of lovely blooms for my flower press, and they made my heart skip happily in the bright sunshine. If you'd like to read about flower pressing I've written about it here: Making a Mother's Day Card; and How to press flowers at home.


If you love flowers, pressing is a great way to spread the joy throughout the year. It's such a kick to use your pressed flowers in the grey of winter to spread a little colourful, flowery cheer on cards, book marks or even to compile a pressed bloom journal of all the wonderful colour that grew in your garden the year before.

2. Emi's a girl in the school play

Now this is well to the west of weird in my book: my very boyish son is playing a lady in the school play. His school is all boys so there's always an issue about who plays the female parts. They're staging a version of the Pied Piper and little Emi has been cast as one of the mothers who loses a child. He says he got the part because the Master asked him if he'd mind being a girl, and he said that he'd be happy with any role they gave him. We've had to buy him a dress (weird and getting weirder), and kit him out with a lady's wig and a shawl (off-the-scale weird). When I finally get over myself and stop saying weird  I'm going to embrace the positive and feel happy that he has the self-confidence to feel comfortable playing that part.


3. Slinky Paws, the bandit squirrel, appears to have died through over-consumption of fat balls!

My nemesis, old Slinky Paws, has been conspicuously absent since Monday when he gorged on 3 huge fat balls that I'd hung up for the birds. In my last dispatch from the front I mentioned how the battle lines had been drawn following the Wonder Dog's disastrous encounter with Slinky's left-overs. 
Slinky in action
4. The Wonder Dog has made a remarkable recovery

Happily (for both of us) the Wonder Dog's digestive tract has now fully recovered and he's back to normal service. 

It was SO not my fault!

5. I'm sharing my garden with a goldfinch!

In Slinky's absence I've fallen in love with a little goldfinch who drops by from time to time for some seed. Isn't he just the most adorable little chap?


When I was upping my game against the Slinkster with some squirrel-resistant feeders I bought one that will only dispense seeds to the smaller feathered fraternity, which I'm going to keep stocked up with niger seed for the finches. Apparently they go nuts for niger seed.

And finally I'd like to say Welcome Back! to Nancy at a Rural Journal, who's come back from her sabbatical to resume her Friday Blog Hop. We've missed you Nancy; it's good to have you back.

All the best for a lovely weekend,


Bonny x

As shared on Random Friday


Thursday 5 March 2015

Mother's Day Card ...

Here in the UK we're all set to celebrate Mother's Day on Sunday, 15th March. I think they use different dates in the US and in Australia.

Normally we make a photo card for my mother with some of the funny snap shots that we always seem to have an abundance of in our family. But this year I've also made a card for her using some pressed flowers from the garden.


I started with a blank card, and stamped it with a Just for You! stamp. Then I got to work gluing on my pressed flowers. I use a wood glue that turns transparent when it dries out.


You wouldn't believe that those wonderful red leaves on the card were really the pressed remains of my Christmas poinsettias. I'll let you into a secret: my Christmas poinsettias ended up looking like this:


Shush! Don't tell anyone or Social Services will be after me for cruelty to pot plants. The truth of the matter is that I'm not brilliant at keeping my poinsettias alive, and they rarely make it through to the New Year under my tender care. But the silver lining is that I was able to salvage some red leaves (or are they petals?) to press. I turned them upside down on my card as I thought that the underside with all those wonderful green-tinged veins brought more texture and interest to the composition.

Not very long ago those large pressed flowers in the centre looked like this: 


They're hellebores from my garden. I bought a starter/ mixer pack of six a few years' ago, and they've given me my money's worth ever after with so much colour in the grey months of January and February when there's nothing else in bloom.  I cut these ones a few weeks' ago, and put them in the press wondering how their big fleshy blooms would turn out. And the answer was: beautifully. See what I mean: 


The colours contrast rather well with the poinsettia leaves, don't you think?

The third guest at the party was a dwarf cyclamen, which was growing just beside my front door. I buy cyclamens every year to add a little mid-winter colour to my flowerpots. Once they've done their thing I plant them in the flower bed at the front and they've been rewarding me with colour through the greyest months of the year ever since. 

If you'd like to press some flowers of your own for card-making it's super easy. I made my own press from some bits of plywood using a jigsaw. You can read about it here: how to make a flower press

And today, when I had a snoop round the garden to see what was worth foraging for my press, I came up with these beauties: 


Aren't they wonderful? I've got some more hellebores, some primroses, a few dwarf cyclamens and an early flutter of scented violets. I also found these slightly different hellebores, which were so pretty that it felt positively sinful to squeeze them in the press: 


It was a lovely dry, sunny day so I picked them and laid them out straight away as the filling between newspaper and cardboard sandwiches in the press. If there's any rain you'd be best advised to pick your flowers with their stems intact and leave them indoors in a vase of water to dry out for several hours before pressing. If they're damp they're liable to go a bit mouldy in the press.


It's also not a good idea to bunch them too close. If they touch one another they tend to meld together, which will leave them looking strange.

I'll leave these babies to press for a few weeks, and when they're done I'll take them out and see what they inspire me to make.


Maybe I'll make another conventional bouquet, or maybe it'll be the swishy dress for a flower fairy. 


All the best for now,


Bonny x

As shared on Friday Finds